From Seed to Shelf: The Stages Behind a Bag of Lentils
Trace the seed-to-shelf path of lentils and learn how harvest, cleaning, grading, and packaging help you compare bags for your recipe and pantry.
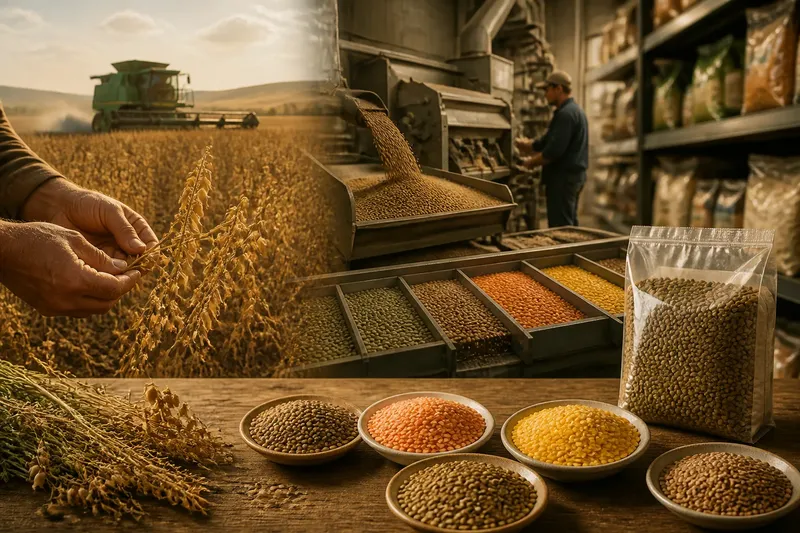
Which bag of lentils should you bring home, and what happened to its contents before they reached the shelf? The seed-to-shelf path runs through planting, harvest, cleaning, sorting, and packing. Each stage helps explain what you see in the bag—and what the label cannot tell you.
A retail bag is not simply a harvest transferred into packaging. Lentils may be cleaned, sorted, and combined into lots before sale, so some variation in color, size, and broken pieces is normal. Knowing the stages helps you choose a product for your recipe and assess the clues available on the package.
Seed choice sets the crop’s starting character
A grower selects seed suited to the intended crop and local growing conditions. Lentils grow as low, branching plants with pods, and their seeds include green, brown, red, and yellow types. Variety influences visible traits such as color and shape, as well as how the crop matures and handles during harvest.
Before planting, seed may be cleaned and checked for unwanted material or damaged seeds. The grower also considers the field, soil condition, and planting window. Those decisions affect how evenly plants emerge and mature. If a crop ripens unevenly, some pods may be ready while others remain less mature, making a clean harvest harder.
Seed variety does not determine every detail in the final bag. Weather, field conditions, equipment, and later sorting all influence the lot. Variety offers a starting point, not a promise that every lentil will arrive intact or cook in exactly the same way.
Harvest timing balances mature pods and field loss
As lentil plants mature, their pods dry and change color. A grower aims to harvest when enough of the crop is ready while limiting shattering, when dry pods open and release seeds before or during harvest. Waiting too long can leave more seeds on the ground; harvesting too early can bring in plants and pods that are not fully dry.
Harvesting equipment cuts or gathers the crop and separates seeds from much of the plant material. The harvested grain can still contain lentils alongside stems, leaves, pod fragments, soil, and seeds from other plants.
Harvest conditions affect what happens next. Material that is too damp may need attention before storage, while a dusty or debris-heavy crop needs more cleaning. The combine gathers a mixed load; it does not turn the field into a retail-ready product.
Cleaning removes material that is not part of the food lot
At a processing or handling site, equipment separates materials by properties such as size, weight, and shape. Screens can let small particles fall through or hold back larger pieces. Airflow can lift lighter chaff away from heavier seeds, and magnets may capture ferrous metal fragments. Facilities use different combinations of equipment.
Cleaning is not the same as washing. Dry lentils are generally cleaned mechanically while they remain dry. Washing is usually left to the cook, who can rinse lentils in a fine-mesh strainer before preparing them.
Cleaning has limits: no single separation method can identify every difference between a lentil and a similar-looking seed. Several stages may be used, and occasional natural variation can remain in a bag.
Grading sorts cleaned lentils into saleable lots
After cleaning, a processor can sort lentils according to the product’s intended requirements. Screens separate different sizes, optical sorting equipment can distinguish colors or visible defects, and other methods may separate seeds by density. The goal is a more consistent lot, not identical seeds.
Sorting shapes what shoppers see. A bag sold as a particular type or color is expected to contain recognizably that product, though small variations in shade, shape, and size may remain. Depending on the processor’s specifications, broken lentils may be separated from whole ones; some broken pieces can go to another food use.
Processors may blend cleaned lots to meet a desired product profile or keep them separate to preserve a distinct variety or origin. A blended lot can be more uniform, but may not come from one field or harvest area. Package information may not give that level of detail.
Packaging protects the lot and identifies the product
Once a lot is ready, it moves into retail or food-service packaging. Bags may be clear or opaque, while larger quantities may go into sacks or bulk containers. Packaging holds the dry product together and limits exposure to handling and moisture during storage and transport.
The label can provide the product name, net contents, cooking directions, and business details. Origin statements vary in specificity. A country name may refer to where lentils were grown or processed, depending on the wording and applicable rules. If origin matters to your choice, read the full statement and consult local labeling guidance where needed.
At the store, use a few concrete checks to compare options. Each result points to a practical decision:
- Check whether the package is torn, unsealed, or punctured. If it is, choose an intact package; if all visible packages are damaged, ask staff whether another supply is available.
- Look for dampness, condensation, or clumped lentils. If you see any, select a dry package; if none look dry, choose a different product or return later.
- In a clear bag, check for stones, stems, or other visible debris. If you see several pieces, choose a cleaner-looking bag; if you see only a small amount, pick through and rinse the lentils before cooking.
- Compare the color and shape with the product name. If the contents look like a different type or include an unexpected mix, choose a bag whose appearance matches your recipe; if a mix is named on the label and suits the dish, keep it under consideration.
- Check whether the label identifies whole, split, or hulled lentils. If your recipe depends on lentils holding their shape, choose whole lentils; if it calls for a softer, thicker texture, consider split lentils.
- Read the origin statement and product description. If they provide the detail you want, use that bag as an option; if the wording is unclear, check the seller’s product information or choose a label with clearer details.
- For an opaque bag, inspect the seams and label because you cannot see the contents. If the seams are sound and the information fits your needs, it may be a suitable choice; if the package is damaged or the label leaves an essential question unanswered, select another option.
A clear bag lets you inspect color and visible debris; an opaque one puts more weight on the label and the seller’s handling. Neither style, by itself, tells you how the crop was grown or how many lots were combined.
What can a bag tell you about the lentils inside?
Why do lentils vary in color within one bag?
Differences in maturity, variety, and handling can leave small shade variations after sorting. If the contents look noticeably mixed, check the product name and ingredient information to see whether the mixture is intentional.
Does a cleaner-looking bag mean the lentils are better?
A clean appearance is useful, but it does not reveal the crop’s full quality or growing history. Also check whether the lentils suit your recipe, whether the package is intact, and whether the label offers the information you want.
Are split lentils processed differently from whole lentils?
Some lentils are sold whole; others are intentionally split or hulled to make a distinct product. A bag of whole lentils may still contain a few broken pieces from harvest and handling.
Why might the same type of lentil cook differently from bag to bag?
Variety, growing conditions, harvest maturity, and storage can all influence how lentils soften. Follow the package directions and check tenderness as the cooking time approaches its suggested end.
A worked example shows how the stages shape a choice
Imagine you are making lentil salad and want the lentils to hold their shape. You find two packages: a clear bag labeled whole green lentils, with a sound seal and a few visible pale seeds, and an opaque bag labeled split red lentils, with an intact seal and clear cooking directions. The pale seeds are a visual variation, not enough by themselves to identify a different product. Since the salad calls for whole lentils, you choose the green lentils; the split red lentils are better matched to a dish where a softer texture is welcome. At home, you rinse the green lentils and pick out any visible debris before cooking. The decision rests on product form and fit for the recipe, not on an assumption that one bag has a more complete growing history.
Use the seed-to-shelf path when choosing and cooking
Start with the lentil form your dish needs. Whole green or brown lentils tend to hold their shape more readily than split red lentils, which commonly soften into a thicker texture. This is a useful distinction, not an absolute rule: variety and storage can affect the result.
Then check the package for damage, dampness, visible debris, and product information. At home, store dry lentils in a clean, sealed container away from moisture. Rinse them before cooking, and pick through them if you spot stones or other material.
The seed-to-shelf path helps you read a bag without expecting it to tell the entire story. For your next purchase, match the product name and form to your recipe, use visible condition and label details to compare options, and treat small natural variations as one clue rather than the whole decision.